Paint

Painting Furniture with Chalk Paint

Today I’m talking all about painting furniture with chalk paint.

Painting Furniture with Chalk-Type Paint

If you take a look around my blog, you’ll quickly realize I am a huge fan of any type of chalk-type paint (or miracle paint as I lovingly call it).

Painting with Amy Howard One Step Paint

Chalk-type paint eliminates the prep work and doesn’t require stripping, sanding, or priming!  It adheres to almost any surface, dries quickly, and cleans up easily with soap and water.  It’s pretty close to the perfect paint.

Distressed Yellow Chalk Paint

If you’re new to painting furniture, go ahead and try chalk-type paint!  I think it will help you gain confidence, and let you then branch out to other paint types – although you may not want to after you see how easy it is to use!

Gray Chalk Paint Distressed and Dark Wax

To begin, I usually just wipe down a piece to remove any dust or dirt.  I personally have never used a primer with chalk-type paint, but I would suggest it if the piece has a really glossy finish.

Step 1:  Paint

Paint the entire piece with paint.  I usually use a brush (but a small roller could come in hand for some pieces such as cabinets).  You’ll find that a little paint goes a long way, and I almost always use two coats of paint.  Chalk-type paint dries really fast, but make sure the first coat is dry before applying the second.

Chalk Paint Tutorial

Step 2:  Wax (Clear)

After the paint is completely dry, apply two coats of wax on the piece using a wax brush.  I don’t wait for the first coat of wax to dry before I apply the second coat.  A tip when waxing, less is more! You are not limited to using wax, but wax does work well with chalk-type paint.  However, I would recommend a water-based polycrylic for cabinets, table and desktops, floors, and outdoor furniture.

Adding Clear Wax to Chalk Paint

Step 3: Wax (Dark)

This step is optional.  Dark wax is good if you want to bring out details and/or like the aged look.  You must apply clear wax BEFORE you apply dark wax.  Go easy on the dark wax.  You won’t need much!  Apply the dark wax with a brush over somewhat dry clear wax.  Remove excess wax with a lint-free cloth.

Adding Dark Wax to Chalk Paint

Step 4: Buff Buff the wax using a lint-free cloth.  It’s pretty easy to see where you missed the wax, so you can easily touch those places up with a brush or rubbing the wax in with your cloth.  Buffing helps smooth out and remove extra wax.

Buffing Chalk Paint Wax

Step 5: Sand  I recommend sanding after you apply the wax because of the chalk nature of chalk-type paint.  It will make a mess if you sand before waxing and then you risk waxing in the chalk paint particles.  I usually sand the edges and places where normal wear and tear would occur.

Sanding Chalk Paint

And that’s it!  This is by far my favorite paint to use on furniture. You can also see the more basic tutorials in my Painting Furniture Tutorial Series by clicking HERE. Still want more tutorials and information on painting furniture with chalk-type paint, milk paint, spray paint, latex paint, and oil-based paint?  Then you need to check out my eBook, Painting Furniture.  Receive your FREE copy by signing up for my newsletter.

Go create something!

Are you new to my blog? Go HERE to see my home tour and HERE to shop for items I use in our home.

Find me on Facebook | Instagram | Twitter Pinterest

Paint

Painting Furniture Series

I’m celebrating the release of my new eBook with this new series!  I won’t go as in-depth as I do in my book, but I will provide you with the basic steps to painting a piece using five different paint types.  Discover which paint works best for your next painting furniture project.

Painting Furniture Tutorial Series by Sincerely Sara D

I am providing tutorials for these five different types of paints:

Latex Paint

Click HERE for the Latex Paint Tutorial and learn about using water-based paint (wall paint) on your furniture.  

Chalk Type Paint

Click HERE for the Chalk-Type Tutorial, and you will fall in love with not needing to sand or prime with this paint.

  Milk Paint

Click HERE for the Milk Paint Furniture Tutorial and learn how to use this paint that will surprise you every time.

  Spray Paint

Click HERE for the Spray Paint Furniture Tutorial if you want a very quick solution.  

Oil-Based Paint

Click HERE for the Oil-Based Paint Furniture Tutorial if you want a finish that is a hard enamel.  

If you want more detailed tutorials and information beyond this painting furniture series on painting furniture with chalk-type paint, milk paint, spray paint, latex paint, and oil-based paint, then you need to check out my eBook, Painting Furniture.  You can receive a FREE copy by signing up for my newsletter.    

Go paint something!

Are you new to my blog? Go HERE to see my home tour and HERE to shop for items I use in our home.

Find me on Facebook | Instagram | Twitter Pinterest

Printables

Printable Chore Chart

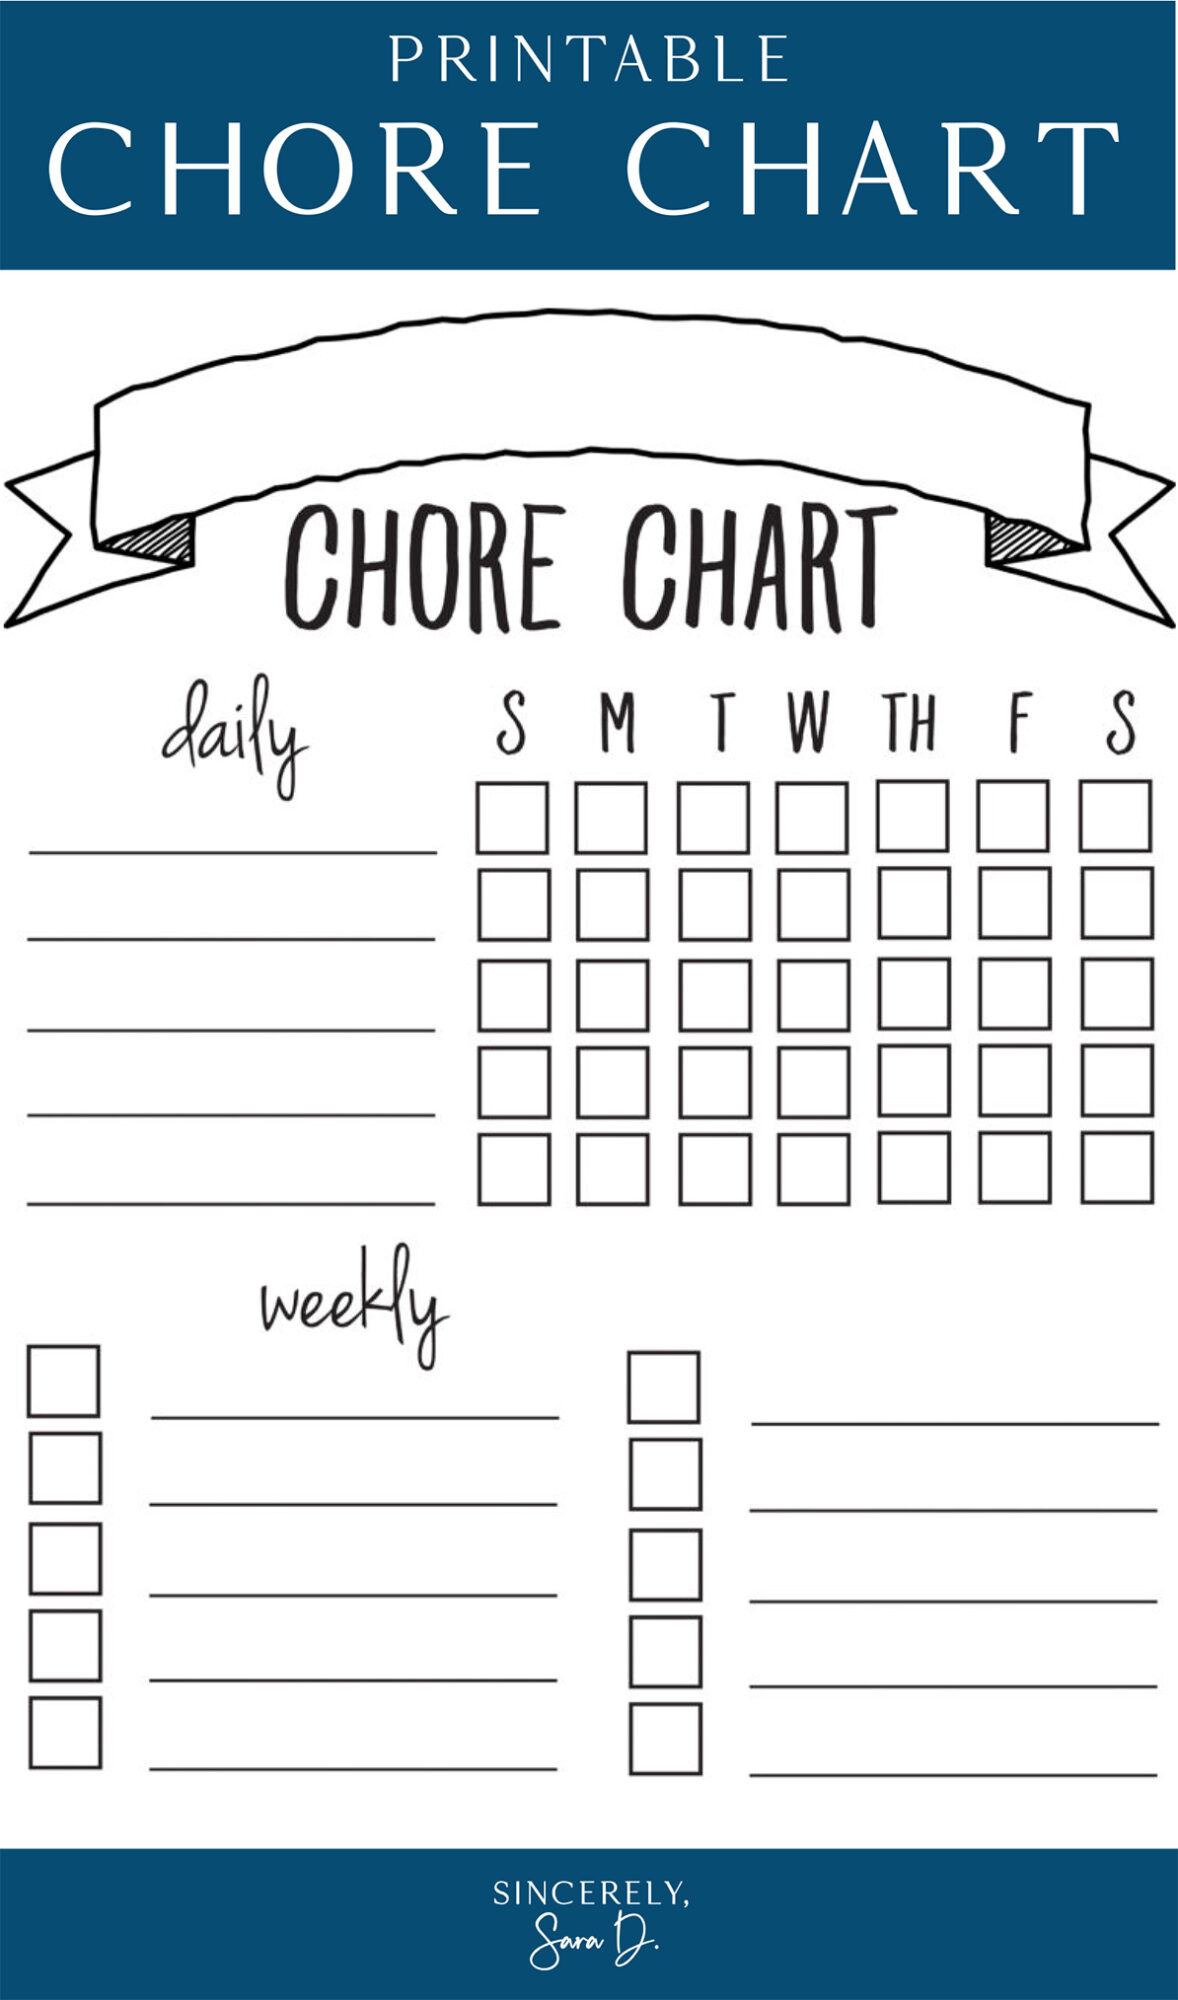
It is time for all of us to follow through with those New Year’s resolutions we made just a few weeks ago. Now that my kids are getting older (10, 8, and 4), I made a resolution to have them help with cleaning the house.  And to make sure I actually follow through this year, I created a printable chore chart.

DIY Printable Chore Chart

Now I realize it takes work (on our end) to do chore charts, but they are great accountability for everyone.  Chore charts provide instant gratification for the kids – checking off a list or task is always a good thing! Here’s the free chore chart I created, and you can personalize it for your child (or husband):

  Print

To open and save your own chore chart printable, Click HERE –> CHORE CHART

And if you want to laminate and frame the chart as I did, here’s the tutorial:

Making a DIY chore chart Here’s what you’ll need:

  • Glue Gun
  • Twine
  • Wood Stain (I used dark walnut)
  • Ruler
  • Scissors
  • Xacto Knife
  • Balsa Wood (or thin pieces of wood) *I found my balsa wood in a pack at Hobby Lobby.

Balsa Wood

Measure and cut your wood.  I made mine slightly larger than the 8.5-inch printout.

Adding Stain

Next, I stained my piece of wood.

Making a chore chart

While the stain was drying, I lamented my printout.  If you have access to a laminating machine, that is your best bet.  We are laminating it so we can use dry-erase markers and use the chore chart week after week.  I used clear contact paper, but it’s a little more stubborn with the dry-erase markers.  I noticed the red doesn’t erase very well on the clear contact paper.  (Clorox® Disinfecting Wipes work great for erasing!)

Adding contact paper

I measured and cut my contact paper allowing an inch or two to hang off the top and bottom.

DIY Chore Chart

This extra material is where you will attach the wood frame.

Adding Hanger to print

I glued the twine to the extra contact paper.

Adding Hanger

Then, I added glue to the balsa wood and attached it to the chore chart on the extra contact paper – covering where I attached the twine.

Adding Glue

Add a piece to the bottom, and you’re done!

Chore Chart

I used permanent markers for my kids’ names and chores.  The kids use a dry-erase marker to mark their chores.

Printable Chore Charts DIY

Go get those kids to work!

Is this chore chart not quite what you were looking for?  I also have another FREE printable chore chart HERE.

Go create something!

Are you new to my blog? Go HERE to see my home tour and HERE to shop for items I use in our home.

Find me on Facebook | Instagram | Twitter Pinterest


Shop the Post
DIY

Building a Home in the DR

Building a home in the DR (Dominican Republic) is BY FAR my favorite DIY ever!

My Best DIY: Building a House in The Dominican Republic

A few weeks ago, I had the amazing opportunity to participate in a home build.  It topped any DIY project I have ever done (and probably ever will do)! Through YWAM San Pedro and Homes of Hope, my family was able to build a home for a family in the Dominican Republic.

San Pedro Homes for Hope

Late last spring, my husband’s parents asked if we (along with his sisters and their families) would be interested in building a home as a family for a family in need. We decided to forgo our normal Christmas gifts for each other and put the money we would have spent on each other towards this home build and trip. The day after Christmas, all 15 of us (which included 7 kids) traveled to San Pedro in The Dominican Republic.  The next day, we were picked up from our hotel and taken to the neighborhood where we were building the house.

Transportation to building site

The neighborhood streets were extremely narrow (so narrow that the bus had to drop us off, and we had to walk much of the way).  The homes had dirt floors and were built right next to each other.

Home Before

The home we were building was for a single dad with three teenage daughters and grandpa and grandma.  In the photo above, you can see the entrance to their home.  The green door opened to a small room with beds covered in mosquito nets.  The space was SO small I had trouble taking a photo:

Home in The Dominican

Thanks so YWAM, our home build was well organized.  When we arrived at the site on the first day, a concrete slab had been poured and all the supplies were waiting for us. I attempted to stand in the same spot and take a photo as the house went up.  In just three days, it was complete!

YYAM San Pedro House Build

The build itself was hot, dirty, and exhausting.

San Pedro Homes of Hope

However, seeing the family’s current living conditions and working side by side with them and YWAM staff was so motivating.

Painting Buddy

The photo above is a painting project I did on the kitchen bar with my painting buddy, 15-year-old Darling.  He is related to the family (for who we were building the home), and we share a love for painting. We wrote, “Dios Bendigo esta Hogar” which means God Bless this Home.

Building a home This is one of those experiences that is just so hard to put into words and my perspective has been forever changed.

Lifting the house wall

Not only were we transforming the lives of a family with a safe new home with a roof without holes and a cement (!) floor, but my life (and my family’s) life was forever changed.

Homes of Hope

I felt like my heart could explode as I watched my husband and kids participate in the build.

Kids helping with the build

San Pedro Home of Hope

Kids helping out

And I loved how despite language barriers, my children became instant friends with the neighborhood kids.

Benson . John .Silas

Dominican Kids

Lena

Dominican Kids

The girls

Since the homes were built so close together, there was a major shortage of space.  We built, painted, and played in narrow alleys.

Working in Dominican The YYAM staff kept us fed and hydrated.

Building a home with our kids

What started on day one with a slab and a group of people…

Getting Ready to Build

…ended on day three as a new home for a family.

YWAM San Pedro House Build

House Build completed

These people stole my heart, and in many ways, reshaping it.  I’m still processing this experience and am forever thankful for the opportunity.

Homes of Hope

They were so joyful and giving despite having so little and knew the meaning of community.  I learned so much observing them as they shared with each other and spent time together.

Dominican People I am forever grateful for what they gave us.

Building a Home in the Dominican Republic

If you want to know more about YWAM and Homes of Hope, click HERE, and check out this video of our experience:


Go create something!

Are you new to my blog? Go HERE to see my home tour and HERE to shop for items I use in our home.

Find me on Facebook | Instagram | Twitter Pinterest

Decor

Be Brave. Use Your Gift and Discover Your Purpose.

Be Brave. Use Your Gift and Discover Your Purpose 

Sincerely, Sara D

I recently had the honor of speaking to a mom’s group at a friend’s church.  As a blogger, I spend my time behind the screen – and there’s a reason for that.  I’m a writer, not a speaker!  However, I knew this was something I needed to do, and the women were so kind and welcoming. I spoke about being brave and finding your passion and purpose.  My prayer is that God can speak through me and encourage some of you! Below is the speech I gave:

I have some OCD tendencies. I like NEED order and schedules. I know God has a sense of humor because he blessed me with three children. Obviously trying to keep a clean and organized home with kids is like shoveling in a snowstorm. It’s basically impossible, right?! I’m from a small town in Southern Illinois. I’m the middle of three girls. At a young age, I was very into art (I was the coloring contest queen in my little town), and I loved decorating my room. I was probably the only elementary-aged girl with a Victorian-themed room. I spent hours deciding on the best placement of my doilies and teacups. Needing to get away (but not too far away), I went to Anderson University. I decided to major in business with a minor in art. After my first art class (despite loving creating and knowing I had talent), I immediately walked over to see my advisor to drop it. I was afraid. Insecure. Filled with self-doubt. I chose not to be brave. Now sometimes doubt can be a necessary force that encourages us to keep building. However, most of the time (like in my case), I find it’s a negative thing. I loved creating and knew I had talent, yet I told myself I wasn’t good enough to be an art major. Doubt can hold you back if you allow it to. Instead of running to the advisor, I should have prayed about my decision first.

The following year, I met and began dating my now-husband. Steve was (and still is!) my best cheerleader. He encouraged me to go for art again. So, and the beginning of my junior year, I picked up a second major in art and design. I decided to be brave! While writing this, I realized that I’m not a very good encourager to my husband, yet he is always encouraging me.

Encourage

A brief aside: Have you ever considered the value of an encourager? To encourage means “to inspire with courage, spirit, or hope.” “Encourage means to fill with courage or strength of purpose.”Barnabus, the new testament early church leader, was known as the“Son of Encouragement.” Do you have any Barnabuses in your life? Are you a Barnabus for others?  For those of us who aren’t especially brave by nature, someone to help inspire us with courage, to provide us with the strength of purpose can be very important. And I want to become a better encourager myself, too.

Anyway… Steve and I were married the summer after we graduated from Anderson, and he went on to school at IU Bloomington. I found a job at a greeting card company that I absolutely LOVED. The year and summer before we moved to Bloomington, I attached that greeting card company with resumes and phone calls. I had worked so hard for that art major, but just because I was graduating with it didn’t mean I was going to get a job where I used it in a field I loved. The fear of not having a creative job was a great motivator (and of course I had my encourager constantly telling me I could do it). I ended up getting a temporary position with the greeting card company a week before we were married. We were definitely singing praises over the course of those weeks! My temporary job became a permanent position, and four years into my career, I had my first son. Steve was working crazy hours, and we were living on the Northside of Indianapolis which made Bloomington a long commute. We made the decision for me to quit my job and stay at home. Although incredibly thankful to be home with our son, I hated it. I had trouble finding purpose in sleepless nights, feedings, and endless diaper changes. I had no time for myself, and I was depressed and lacked passion for anything at that point in my life. I was honestly just too tired. Luckily, I found a Bible study full of the most encouraging women who were both in my stage and out of it. I realized that what I was going through was a phase. I’m sure you’ve heard the quote, “The days are long but the years are short.” And boy the days really can feel like the clock is just ticking by – especially during the witching hours between naps and dinner. My job and purpose at that point in my life were to care for my baby. Although it felt minor, it was a huge responsibility. My baby was going to become an adult someday, and I was given the responsibility of God to raise him.

Some of you are so much healthier about this than I was! There really are moms who from day one love being a mom and want nothing more. I wanted to be that mom…desperately! But I wasn’t. You live and learn, and while I was in the middle of being a mom of babies and toddlers, I discovered that I needed to take care of myself to be a better mom and wife. (Staying sane is important.) I got myself ready each day – whether or not I was leaving the house. It wasn’t anything amazing, but I did my hair and put on a little bit of makeup. It barely took any time, and it made a huge difference in my attitude. I also carved out a little bit of me-time. I made late-night runs to Target (kid-free) and enjoyed a little bit of quiet time while the kids napped – I would read or watch tv.

Joyce Maynard

They are learning from us! If we don’t go after our dreams, how will they ever learn to chase after theirs? As my kids got older, they required a little less of me which meant I slowly found a little more of me. I began creating again – invitations, decorating, painting walls…slowly I was uncovering my passion. I prayed that God would show me what He wanted to do with my creativity.When Steve would be gone on work trips, he always came back to a project. In the evenings after the kids were in bed, I would get restless and creative. Most of the time the projects involved painting walls – and boy did I do some crazy things! Luckily those walls could be repainted, and I’m sure they have been with the home’s new owners.  

Once Steve was gone a little longer than normal since he was on a mission trip with our church. When he came back, I had created my business. Sincerely, Sara D. was born. For close to two years now, I’ve been working on growing my business and praying that God uses it and my gifts to glorify Him. I love my job, and it brings me so much joy. For now, I feel that I have found my passion and purpose. Finding our purpose in life is probably our greatest quest as humans. It is a theme in any stage of life, largely because our specific purposes may change – or at least be carried out differently – in different seasons of life. Thankfully, we as believers can rest in the fact that our lives do have a purpose. God created us with intent, He knows His plans for us, and He is eager to reveal Himself to us. He desires that we know Him, we enjoy Him, we witness Him, and we live out our unique role in his body.

Jeremiah

A purpose that applies to all humans is that of knowing and enjoying God. God did not have to create humanity – He has no needs. But, He chose to create us so that we could fellowship with Him. And as believers, our purpose here on earth is to share the gospel. We as his disciples are to go and make fishers of men by sharing the message of salvation. However, each one of us was formed with a unique purpose and passion. God didn’t make all of us the same – we’re each his unique handiwork.

The Bible is full of examples of God’s personal touch on people’s lives. The prophets were individually called by God for a specific time and purpose. Abraham, Noah, Joseph, Ruth, Esther, Mary, and multiple other gifts were used by God for His purposes. First Corinthians 12:12-31 talks about the Church in terms of a body. Each member of the Church has a different purpose, just as each portion of the body is used for different things. Romans 12:6-8 and1 Corinthians 12:4-11 list several spiritual gifts a person might have. We know from science and psychology that people are unique. No one in the world is exactly like you. God made that design. Psalm 139 is a beautiful depiction of the care with which God created us. He “knitted us together in our mother’s womb”. There is a unique purpose that God has just for you.  God has a plan for one each of us.

My friend Amy Howard said:

AMY HOWARD I want us all to dream big and think about what you are passionate about. I personally feel I was created to create. I want to share my love of creating with others – especially women. I love the relationships I’m forming with women through my blog and readers and classes.

What is your gift? A gift is something that you’re not only good at, but it’s something that you have a desire to do. When you’re using that gift you’re filled with joy and power and you often find that you’ve found your passion. Embrace your gift and find your passion. This will take courage, but the most unnatural path to take is to not do what you were made to do. Singers want to sing. Painters want to paint. Teachers want to teach. Embrace your gifts and find your passions! This will require courage, so let’s be brave and dream big together.

I’m going to read several verses, and I want you to write them down, and pray through them later in your quiet time.

Verses

The need to dream never should disappear. For some reason, we stop dreaming after having kids. You know that when you were a kid, you dreamed about finding prince charming, marrying that prince charming, and living happily ever after with your babies. However, that’s not the end. There are still dreams to be dreamed. What were you made to do? Ask yourself these questions, “If you could snap your fingers and you knew you couldn’t fail, what would you do?” At the end of your life, you would love to look back and know you had done something about…” If someone were to mention your name in a group of your friends, what would they say you were really interested in or passionate about?” What would you most like to do for others?”

Be Brave

Thanks to all the lovely ladies of the MUMs group in Berne, Indiana!  You were all so kind and encouraging!

ladies at speech

ladies at speech.

Go create something!

Are you new to my blog? Go HERE to see my home tour and HERE to shop for items I use in our home.

Find me on Facebook | Instagram | Twitter Pinterest

Home

Indianapolis Home Show

Let’s Meet at the Indianapolis Home Show! Let's Meet at the Indianapolis Home Show! I am speaking at the Indianapolis Home Show later this month!  If you’re local, I’d love for you to join me on Monday, January 25th (at 2 pm and 4 pm) or Tuesday, January 26th (at 2 pm and 5 pm).   If you buy your tickets now, you can get $4 off with my code: SARA Click HERE to buy your tickets! Sincerely, Sara D I’ll be talking about painting furniture using 5 different types of paint:
  • Chalk-Type Paint
  • Latex Paint
  • Milk Paint
  • Oil-Based Paint
  • Spray Paint
We’ll discuss the pros and cons of each, AND there will be a paint giveaway at each of the four presentations.  I’ll be giving away some of my favorite furniture painting products from Amy Howard at Home! One Step Paint by Amy Howard And, I’ve been working on an eBook all about painting furniture using these five paint types which will be released soon – just in time for the Home Show. You can receive your FREE copy of my eBook by signing up for my newsletter.   Let’s meet at the Indianapolis Home Show – hope to see you there! Go create something!
Are you new to my blog? Go HERE to see my home tour and HERE to shop for items I use in our home. Find me on Facebook | Instagram | Twitter Pinterest
DIY

Top DIY Posts of 2015

Top DIY Posts of 2015

Top DIY Posts of 2015

Happy New Year!  I’ve been completely unplugged for the past week spending time in the Dominican Republic with my family.  While there, I participated in my favorite DIY project yet, and I’ll be sharing more with you all very soon! While  looking through my blog stats from this past year, I discovered that my five top posts this past year were actually from 2014:

  1. Perfect Chalkboard Lettering
  2. Starched Fabric Wall
  3. Painted Faucet
  4. Spray Paint Thrift Store Finds
  5. Shortcuts for Painting Cabinets

Apparently, my projects in 2015 weren’t as well-loved as the previous year’s, and obviously, that means I need to step it up in 2016!  

Anyway, here are my top DIY projects for 2015:

1. How to use Vaseline to Distress Furniture

This post is a video tutorial.  I teamed up with Angela from Unexpected Elegance and we created several DIY video tutorials.

Vaseline for Distressing

2. Bathroom Wall Paneling

The starched fabric wall was the beginning of this project, but the wall paneling completed the look.

Easy Wall Treatment

3.  Applying Wax to Chalk Paint

This is another video tutorial.  Remember, less is more!

Applying Wax to Chalk Paint

4. Adding subway tile in kitchen. 

My kitchen didn’t have a backsplash, and I was in love with all the timeless subway tile floating around Pinterest.

Subway Tile in Kitchen*

5. Unique ways to decorate pumpkins.

After my spray-painted pumpkins exploded in 2014, I was done decorating with live pumpkins.  And, decorating fake pumpkins means they can be enjoyed year after year…

Fun DIY Pumpkins

Blessings to you all and Happy 2016!

Go create something!

Are you new to my blog? Go HERE to see my home tour and HERE to shop for items I use in our home.

Find me on Facebook | Instagram | Twitter Pinterest

DIY

Build Your Own Shoe Cubby

Build Your Own Shoe Cubby

I am really excited to share some news with you all, and it has to do with this shoe cubby:

Build Your Own Shoe Cubby with Remodelaholic

My antique mail sorter turned stylish shoe storage was seen last year in my mudroom reveal and in my DIY chalkboard Calendar post.

Shoe Cubby

I receive more emails regarding this project than any of my blog topics.  

Earlier this year, I had a reader email me for the shoe cubby dimensions and that same reader (Kristi) shared her DIY shoe cubby with us.

Home Made Shoe Cubby

Kristi is pretty amazing, isn’t she? I love that created her own version of the shoe cubby.

Just a few months ago, I was contacted by Remodelaholic.  They wanted to feature my cubby, Kristi’s DIY version, AND (here’s where the awesomeness happens for you all) create plans for this piece!  

shoe-cubby-plans

Now you can build your own shoe cubby by clicking HERE.  We perfected what was wrong with the original pieces in regards to storing shoes.  We made the cubby a little deeper in the plans to accommodate growing feet – which is rapidly happening in our home.

If you make your own shoe cubby using Remodelaholic’s plans, I’d love to see it!  Please be sure to tag me on any photos and/or send me an email! Go check it out!

Go create something!

Are you new to my blog? Go HERE to see my home tour and HERE to shop for items I use in our home.

Find me on Facebook | Instagram | Twitter Pinterest


Decor

Kitchen Nook Update

I’m sharing our kitchen nook update today. 

Kitchen Nook Update

When we moved into our home two years ago, we brought our old furniture with us.  Our old kitchen nook was half the size of our current space, so the furniture was too small for the space:

Kitchen Nook - Before.

After admiring a wooden beaded chandelier for close to two years, I finally splurged and bought it. (I couldn’t say no to the sale price plus a coupon!)  It’s from World Market, and it really helped fill the space.  However, now I was top-heavy.  I tried to switch out the chairs with chairs I had around the house, but space still wasn’t working.

Kitchen nook BEFORE

I wanted a farmhouse table, but I didn’t want to spend the money (especially after buying the new light fixture and wanting new chairs.)  I decided to give my old table a makeover using Amy Howard at Home paint and new legs from Tablelegs.com.

Kitchen Nook Area

With the money I saved from DIYing my farmhouse table, I was able to splurge (again) and buy these beautiful chairs from Overstock.

Screen Shot 2015-12-04 at 11.52.41 PM

I bought them thinking they came in pairs.  Unfortunately, they are sold separately.  I ended spending twice as much as I had planned on the chairs, but I do love them!  

Kitchen Nook Makeover

Kitchen Table Update

My kitchen nook makeover was a little more expensive than I had originally planned, but I do love it!

Go create something!

Are you new to my blog? Go HERE to see my home tour and HERE to shop for items I use in our home.

Find me on Facebook | Instagram | Twitter Pinterest

DIY

Kitchen Table Makeover

I gave my kitchen table a makeover!

Kitchen Table Update

Kitchen Table Update

Table Makeover with paint

We’ve had the Pier 1 Carmichael Dining Table for close to five years.

Pier One Table

Kitchen Table - BEFORE

After daily use from three kids and a move, it was beginning to look bad.  The top is a veneer, and it’s starting to wear through in spots.

Table Top

And there was a film over the entire top, so it never looked clean.

Table Top. It was driving me crazy, so I started dreaming about replacing it. Like most of us, I started dreaming of a farmhouse table.  I began looking at farmhouse tables on Pottery Barn, since many of my dreams begin there…

Pottery Barn Farmhouse Table  

The price point was beyond what I was willing to spend.   I could have looked for less expensive farmhouse options, but I started thinking that the only thing separating me from a pretty farmhouse table were table legs and paint.  Why didn’t I just give my table a makeover? After searching online, I discovered  tablelegs.com

Tablelegs.com

I contacted them, and they worked with me to find the best solution.

Switching legs on a table

I ended up ordering four 27″ French Farm Dining Legs in Soft Maple.

Switching Table Legs

They had me measure the notches in my current legs, and they notched out my new farmhouse legs to make installation super easy.

Measurements

To install my new legs with my existing braces, I placed the table upside down on the floor.  Next, we removed the existing legs.  (My old legs were bolted on, and I just removed the bolts.)

Removing Bolts I could have used the old bolts, but we ran into some issues with reusing them.  So, we used new bolts.

Updating a table

Once the old bolts and table legs were removed, I added the new table legs and marked where the new bolts should go.

Mark before drilling

Next, we pre-drilled a hole for the bolts.  (We used a 1/4″ drill bit and our lag bolts were 5/16 – 9×3.)  By drilling a bit smaller in diameter, the threads have something to bit into and hold.

Drilling holes

Once the holes were pre-drilled, the legs were put back on the table and the bolts were drilled in.

Adding Bolts

Changing Table Legs

This post contains some affiliate links for your convenience. Click here to read my full disclosure policy.

I also gave the table a paint makeover with Amy Howard at Home’s One Step Paint in Bauhaus Buff and Atelier.

One Step Paint by Amy Howard

To see more about a step-by-step tutorial for One Step Paint, click HERE. Instead of using wax, I used Amy Howard’s sealer (in matte).  This sealer is great for tables, cabinets, and floors, and it’s so easy to clean. Now my table has an entirely new look thanks to new legs and a coat of paint!

Kitchen Table Makeover

Kitchen Table - One Step Paint

Kitchen Nook Makeover  

Go create something!

Are you new to my blog? Go HERE to see my home tour and HERE to shop for items I use in our home.

Find me on Facebook | Instagram | Twitter Pinterest

*This post contains affiliate links and is a sponsored post through tablelegs.com and Amy Howard at Home. I received compensation in the form of product in exchange for my review. I take pride in reviewing only products that fit my brand and will be beneficial to my readers. And while this post is sponsored, all the opinions are my own.

Printables

Erma Bombeck Quote Print

I’m excited to share this FREE Erma Bombeck Quote Print with you today.

Free Printable: Erma Bombeck Quote

I was working on writing a presentation about using your gifts and discovering your purpose, and I came across this quote from Erma Bombeck:

“When I stand before God at the end of my life, I would hope that I would not have a single bit of talent left, and could say, I used everything you gave me.”

I love this quote and decided it needed to be a printable, so here you go!

To print the JPG file of this Erma Bombeck Quote Print, click on the images below and save it to your computer.

Erma.Bombeck.Quote

Or, here is the PDF  –> Erma Bombeck Quote

Print out a copy of this quote for yourself and for a friend.  This printable also makes a great gift – frame it to make it even more special!

To see the full presentation I mentioned earlier, you can go here.  I spoke to a group of women about being brave and using your gifts to discover your purpose.

Do you love free printables?  I share a lot of them here on the blog – everything from cleaning charts to chore charts to quotes to Bible verses!

Go create something!

Are you new to my blog? Go HERE to see my home tour and HERE to shop for items I use in our home.

Find me on Facebook | Instagram | Twitter Pinterest

Free Erma Bombeck Printable

Decor

Photo Gifts with Minted

Photo Gifts with Minted 

Photo Gifts with Minted

If you follow my blog, you know I am a huge fan of Minted.  We ordered our Christmas cards from them this year, and I am in love.

Minted

My career pre-kids and blog was with a greeting card company.  I have a special place in my heart for the beautiful artwork, printing, and fine papers.  Minted executes all of these things perfectly. Besides cards and invitations, Minted has artwork.  And they even have artwork you can customize with your own photos. I thought this Family Timeline by Aubrey Bonneau was sweet and fun.

Minted Photo Art Gift

I personalized it with photos and dates for our family, selected my frame and size, and my order was done.

Minted Art Gift Idea

Minted photo art would make a great baby or first birthday gift.  One of my favorites is Framed Months by Erica Krystek.

Screen Shot 2015-12-07 at 9.24.01 PM

The photo art would also make an amazing wedding or anniversary gift.  I love this photo art entitled Forever After by Christina Novak.

Minted Photo Art

There are several foil-printed pieces like this photo art called Rustic Edges by J. Bartyn.

Minted

Our photo art will be something we treasure for a long time.

Minted Art

Minted Artwork

A special shout out to my mini helper who kept the glare off the glass for my photo session!

Little Helper

Go create something!

Are you new to my blog? Go HERE to see my home tour and HERE to shop for items I use in our home.

Find me on Facebook | Instagram | Twitter Pinterest

*This post contains affiliate links and is a sponsored post through Minted. I received compensation in the form of product in exchange for my review. I take pride in reviewing only products that fit my brand and will be beneficial to my readers. And while this post is sponsored, all the opinions are my own.