Paint

One Step Paint Tutorial

Amy Howard One Step Paint Tutorial – this paint is SO easy to use!

Amy Howard at Home One Step Paint Tutorial

About a month ago, I bought a bench at an auction.

I bought it because I saw what it could be, and it had beautiful bones.  I knew I could fix the dark brown (cracked and peeling) faux leather cushion and the (chipping) finish.

EBTH close up

This post contains some affiliate links for your convenience. Click here to read my full disclosure policy.

I recently spent some time in Memphis with the Amy Howard team.  I was excited to use what I had learned while there, and I gave the bench a makeover with Amy Howard at Home One Step Paint.

One Step Paint by Amy Howard

One Step Paint eliminates the need for sanding, stripping, and priming, and it has the chalky finish you know I love.   I cleaned my bench, and I was ready to paint!

Amy Howard at Home One Step Paint

One step paint is meant to be sheer, but you can add a second coat if you prefer complete coverage.  For my bench, I was looking for more of a washed look, so I painted only one coat of Atelier.

Amy Howard at Home One Step Paint on fabric

Although I eventually want to reupholster the bench seat (the faux leather is in bad condition), I decided to paint it as a temporary fix. I used the One Step Paint in Bauhaus Buff.  I stippled it on using a large round brush.

Painting Leather Amy Howard at Home One Step Paint

Since I wanted complete coverage, I added a second coat once the first coat was dry.  (I finished the seat by sealing it with antique wax, and the cushion was complete!)

Covering Paint brushes

In-between coats, it’s a good idea to cover your brushes to avoid drying them out.

Amy Howard at Home Gilding.

To bring out all the details, I added gold gild to areas of the bench.

Amy Howard at Home Sizing

Once my paint was dry, I brushed on size, a special adhesive for the gold leaf.  I brushed it on using long clean strokes.  I waited until it came to tack – meaning it was sticky.  I waited around 15 minutes for it to come to tack, but it does depend on how thick you paint on the sizing.

Amy Howard at Home Gilding Sheets

The gold leaf comes in a booklet.  I cut my book in half so it was the right size for my piece, and I didn’t waste the leaf.

Amy Howard Gilding Sheets

Applying the gold leaf takes a little practice, but the more you do it, the easier it becomes!

Amy Howard at Home Gilding

Pull the tissue back and while holding onto the tissue and the gold, turn it toward your piece and hold the end with your left hand and lay down firmly.

Amy Howard Gold Gilding

While holding the tissues – in place – rub your fingers back and forth – burnishing them into the surface.

Amy Howard at Home Gilding Process

When you pull up, pull the tissue away.  (When laying multiple pieces, do not try to match lines.  Overlap for full coverage.)

Buffing Gilding

Take a rag, burnish it and clean it up really well.  Then, take steel wool and lightly rub it in one direction.  This allows for some of the paint to show through.

Amy Howard at Home Waxes

Once the gilding process is done, you can begin the waxing process.  Although One Step paint doesn’t require sealing, I used light wax to give my piece some age.

Amy Howard at Home Light Antique Wax

I put my brush into the wax and offloaded it to get the wax even on my brush.

Amy Howard Light Antique Wax

Next,  I went over the entire piece and allowed it to dry for around 20-30 minutes.  Once dry, I did the same process with the dark wax.

Amy Howard Dark Antique Wax

The dark wax is what makes the piece look aged.  Place it where the piece would have gotten age and wear – the top of the piece, around the hardware (if it has any), legs, arms – anywhere your hands would go!

Amy Howard Dark Wax

Once the waxing process is complete, I used Dust of Ages powder.  This powder gets in the crevices and gives your piece an authentic old look.

Amy Howard Dust of Ages Powder

Amy Howard at Home Dust of Ages

I dipped my brush in the Dust of Ages and pounced it on – getting it in the crevices.

Amy Howard Dust of Ages

Using a clean rag, lightly buff to get the patina.

Final Light Buff

And my bench makeover was complete!

Amy Howard Paint Tutorial

I now have an elegant bench (that looks to be a fine antique!) at the end of my bed.

Amy Howard One Step Paint Tutorial

Amy Howard At Home One Step

You can find Amy Howard at Home One Step Paint at Ace Hardware and on their website by clicking HERE. I hope this Amy Howard One Step Paint Tutorial was helpful!

Go create something!

Are you new to my blog? Go HERE to see my home tour and HERE to shop for items I use in our home.

Find me on Facebook | Instagram | Twitter Pinterest

*This post contains affiliate links and is a sponsored post through Amy Howard at Home. I received compensation in the form of product in exchange for my review. I take pride in reviewing only products that fit my brand and will be beneficial to my readers. And while this post is sponsored, all the opinions are my own.

Seasonal Decor

Personalized Gift Ideas

Personalized Gift Ideas

Staples Holiday Gift Ideas

My parents live out of state, but I usually try and help my mom with her Christmas card every year.  This year, we used Staples, and the process was SO easy. Earlier this year, I took a photo of my parents with all the grandchildren.  My parents wanted to use that photo on their Christmas cards.  I uploaded the photo to Staple’s site, and I inserted the photo into several of my favorite designs. 

Staples Holiday Cards

I sent the designs to my parents, and they decided on the blue “most wonderful time of the year” design.

Wonderful Time

Staples Christmas Card - Front

We were able to personalize the front and change the text.

Staples Christmas Card - Back

Our design also had a back, and we personalized it with our own greeting.  And, there are also several font options!  

Staples Christmas Cards

The cards are beautiful with quality textured card stock and rounded corners.

Holiday Cards Staples

I could ship them directly to my mom, and in just a few days, she had her Christmas cards!  It was convenient, fast, and inexpensive.

Staples Puzzle

I also threw in a couple of fun little surprises for my parents.

 Staples also offers photo gifts!  

My family puts puzzles together when we get together for Christmas, and I know the grandkids will be thrilled to see themselves on a puzzle!

Ornaments Staples

I discovered these pretty porcelain ornaments.  They have a front and back design and are great keepsakes. Check out Staples for your Christmas cards and cross off those on your list with their fabulous selection of photo gifts!

Go create something!

Are you new to my blog? Go HERE to see my home tour and HERE to shop for items I use in our home.

Find me on Facebook | Instagram | Twitter Pinterest

I was selected for this opportunity as a member of Clever Girls and the content and opinions expressed here are all my own.

Seasonal Decor

How to Set the Table

If you’re wondering how to set the table, then you’ve come to the right place.

With Christmas just weeks away, the entertaining season officially here!  I have a few tips for making your event a little more special. My mom and mother-in-law both set beautiful tables, and it makes the guests (including me!) feel so loved and appreciated.

Setting a beautiful table also serves those of us who aren’t great in the kitchen.  A pretty setting can distract from not-so-great food.  (Which can really benefit someone like me!) There is a proper way to set a table, and there are two general settings: casual and formal.  The casual setting is definitely more popular, and it’s a great thing to learn because you build off the casual setting and extend it for the formal setting.

CASUAL SETTING

Casual Place Setting

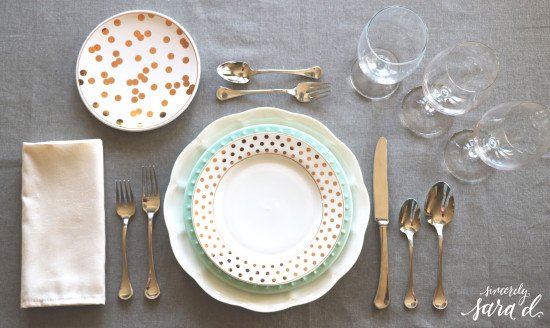
Plate  – Place the dinner plate directly in front of the seat – a couple of inches from the edge of the table.

Napkin – Most of the time, the napkin is placed to the left of the plate.  The napkin can be under the fork or to the left of the fork.  Also, you will sometimes see the napkin on the plate.

Flatware – The fork always goes to the left of the place.  Place the knife to the right of the plate.  The cutting edge should be facing the plate with the knife pointing away from the diner.  A little reminder for which side the knife goes on, think about how a right-handed person would cut their food.  They would use the fork in their left hand, and the knife in their right.  Place the spoon to the right of the knife.

Glass – The water glass goes on the upper right, and the tip of the knife should be pointing to the glass. You can get as fancy as you want and add a lot more plates, glasses, and flatware.  This is often used in meals where more than one course is served.  Use the casual setting as a base and go bigger and better for the formal setting!

FORMAL SETTING

Plates –  The plates still go in the middle, but you stack them with the smallest on top.  (If you have a soup bowl, stack this on the plates.)  By stacking the plates, each plate can be cleared upon completion of the course, and a clean new place will be below.  The bread plate goes above the forks.  Place a small knife horizontally across the plate with the blade facing the left.

Napkins – As in the casual setting, the napkin can be under the forks, next to the forks, or on the plate.

Flatware –  As before, the forks always go to the left of the plate.  Place the dinner fork very close to the plate without touching the plate.  The salad fork goes just to the left of the dinner fork.  You eat from the outside in, so you will eat your salad first which is why the salad fork is on the outside.  You will work your way to the plate towards the end of the meal.  Place the teaspoon to the right of the knife.  Traditionally the teaspoon is used for stirring coffee or tea and the end of a meal.  Place the soup spoon next to the teaspoon and the fruit spoon can go to the left of the soup spoon.  The soup spoon will be larger than the teaspoon in more formal settings.  If you have a dessert fork & spoon.  a small fork and spoon will be placed just above the small plate (1/2 inch) horizontally.  The fork will face right and the spoon will face left. (If guests were to pull the handles of the dessert fork and spoon towards them, the fork would be on the left and the spoon on the right.)

Glasses – If you’re serving wine, the wine glass goes to the right of the water glass.  If you want to set multiple wine glasses (you’re serving red and white wine),  then the white wine glass will be closer to the guest with the red wine glass slightly above and to the left of the white wine glass.  Guests should move from white to red wine.

If you’re like me and need visuals, I’ve created a printable for you so you know how to set the table.

Print

Click here to open a PDF of the printable –> Proper Table Setting

Entertaining Ideas and Tips

Besides setting a beautiful table, music adds ambiance and is the final touch to a perfect evening of entertainment.

Tivoli Audio with Bluetooth

I recently began using Tivoli Audio’s Model One Bluetooth radio (also available without Bluetooth), and I can honestly say that I am IN LOVE.  Not only is the sound amazing, but I love the way it looks.  I have struggled for years with Bluetooth radios/speakers because they are so ugly and don’t fit with my decor.  The Tivoli Model One has a beautiful wood veneer cabinet which is available in multiple colors and finishes to match any decor!

Entertaining with Tivoli

You can utilize the classic AM/FM tuner to listen to your favorite stations, or you can customize your soundtrack and listen to your own music, by switching to auxiliary mode and using the Bluetooth Technology to listen wirelessly.  I’ve been listening to the Christmas playlist on my phone over and over…

Entertaining Tips

The Model One Radio is simple to use and there is no complicated set up which makes it so easy to move.

Tivoli Audio Model One

When we’re not entertaining in our formal dining room, we keep our Tivoli Audio Model One Radio on our bar cart in-between our kitchen and living room.

Tivolia Audio for the home

Tivoli Audio

The Tivoli Audio would make a great Christmas gift for the design or music enthusiast in your life!  Go to TivoliAudio.com to order online or find local dealers. As you plan to entertain this holiday season, don’t forget to set a pretty table and add music.  Throw in some delicious food, and you’ll have the perfect event!

Go create something!

Are you new to my blog? Go HERE to see my home tour and HERE to shop for items I use in our home.

Find me on Facebook | Instagram | Twitter Pinterest

This is a sponsored post written by me on behalf of Tivoli Audio for IZEA. All opinions are 100% mine.

Seasonal Decor

DIY Photo Ornaments

Make these easy DIY photo ornaments for yourself or they make a great gift!

DIY Christmas Photo Ornaments

I love handmade ornaments, and I especially love handmade photo ornaments.

Santa Picture ideas

I’m that crazy mom that insists on my kids getting a photo with Santa every year.  However, now that my oldest is ten, I know the Santa days may be nearing the end.

The Santa pics are one of my favorite things to unwrap every year when I pull out the Christmas decorations.  Since the photos are so special to me, I decided it would be fun to make these photos into ornaments.  (And I can hand them down to the kids someday!)

Photo Ornaments

I don’t have a scanner, so I just took a pic of my photos.  It’s best to take them out of the glass so you don’t have a glare.  You can either print them out yourself or send them to a photo lab as I did.

Supplies for DIY Christmas Ornaments

For these ornaments you’ll need:

  • Photos
  • Wooden shapes or card stock
  • Scissors
  • Mod Podge
  • Sponge brush

*Optional supplies:

  • Printed Dates
  • String (for hanging the ornaments.  I just used ornament hooks.)
  • Edge Rounder

Wood Cut out for ornaments

I found these thin, wood cut-out rectangles at Hobby Lobby.  Originally I was going to cut out my rectangles from thick card stock, but I came across this perfect solution.  The rectangles even have a small hole at the top for hanging.

Easy DIY ornaments

I spray-painted all my rectangles with black paint.  (Obviously, you can buy black card stock and not have to paint, but you will have to cut.)

DIY photo ornaments

Once the pieces were painted (front & back), I was ready to go!

Cutting Pics for Ornaments

I cut out my photos (I sized them to fit my rectangles) and rounded the edges

Cutting years

I printed out dates.  I knocked out the number and made the background black.  I then cut them.

Mod Podge Ornaments

I covered the entire rectangle in Mod Podge and added the photo and date.  Then I added more Mod Podge over the entire piece and let it dry.

DIY Photo Ornaments

Christmas Ornament easy DIY

And that’s it!  You have ornaments that will be keepsakes and they also make great (and inexpensive) gifts!

Go create something!

Are you new to my blog? Go HERE to see my home tour and HERE to shop for items I use in our home.

Find me on Facebook | Instagram | Twitter Pinterest

Seasonal Decor

Christmas Tree Decor

This is a sponsored post written by me on behalf of At Home for IZEA. All opinions are 100% mine.

At Home Christmas Tree

We have always been real tree people, but this past month I have had the honor of working with At Home Christmas Decor on several posts.  (To see my dining room Christmas makeover click HERE and to see my fireplace Christmas makeover click HERE.) During both of those shopping trips, I couldn’t help but notice the Christmas Trees.  At Home has a separate section devoted entirely to artificial trees – 101 varieties. I was quickly won over when I started thinking about how these trees could be used year after year, required no watering, wouldn’t make a mess, and I wouldn’t have to stand in the freezing cold to select a Tree for Me.  I was all in – especially with At Home’s everyday low prices.!

At Home Christmas Tree

At Home has 15 different themes that you can use on their own or group to make your perfect look: Seas & Greetings, Holiday Hoedown, Lavish and Luxe, Peppermint Jazz, Berry Platinum, Forest Fairy Tales, Crystal Chateau, Cherished Memories, Heaven and Earth, Midnight Plume, Regal Renaissance, Snowcapped Scene, Handcrafted from Around the World, Dem Darlings, and Handcrafted.   I used several different themes to get the perfect look:

    • Tree (7.5 foot pre-lit Laurent spruce tree)
    • Shatter Proof Ornaments
    • Burlap Tree Skirt
    • Burlap Ribbon
    • Scentsicles scented ornaments (because I LOVE the fresh tree scent!

Shatter Proof Ornaments

Shatterproof ornaments are a must for us.  I have kids and I have wood floors.  Not a great combination of glass ornaments.


At Home Christmas Decor.

At Home has aisles of ornaments.

At Home Shatterproof ornaments

I loved these geometric-shaped gold ornaments.  They added just a little something special to my tree.

Christmas Tree - lights off

You can turn on the tree lights with the press of a button…

Christmas Tree - Lights On

Christmas Decorating

Want to see more of my Christmas decor?

Decorating for Christmas Ideas

Click HERE to see my dining room Christmas makeover.

Christmas Fireplace Decor

And HERE to see my fireplace Christmas makeover. What’s your favorite At Home Christmas theme?

Are you new to my blog? Go HERE to see my home tour and HERE to shop for items I use in our home.

Find me on Facebook | Instagram | Twitter Pinterest

DIY

DIY Christmas Art

Today I’m sharing DIY Christmas Art.  This is chalkboard art that would look great hanging on a wall or over a mantel.

DIY Christmas Artwork

Recently I shared my fireplace Christmas makeover.  I usually have a large mirror hanging over my fireplace, but I really wanted something to replace it that was solely Christmas.

Christmas Fireplace Decor

To see the full fireplace Christmas decor details, you can click HERE.

Cork Board art work

I used a large cork board from Hobby Lobby for this project.  Use your 40% off coupon, and these will be SO cheap! (To see more DIY projects with these cork boards, click HERE and HERE.) DIY Christmas Artwork

I began by staining the frame.

Cork Board Art DIY

Next, I added chalkboard paint to the corkboard.

Kids Helping

The painting was a slow process because my daughter wanted to “help.”  It eventually got done! I found the (free!) artwork for my piece at The Graphics Fairy.

DIY Christmas Art

I used an old-school projector to get my image on the corkboard.  However, I realize most people don’t have old projectors lying around!  You can print out something (you may need to send it to an office store for this scale) and use my perfect lettering technique.

 Click HERE for the full tutorial. I used a white China marker for this piece. It looks like chalk, but it is permanent. Here’s an Amazon affiliate link:

  Christmas Artwork

Go create something!

Are you new to my blog? Go HERE to see my home tour and HERE to shop for items I use in our home.

Find me on Facebook | Instagram | Twitter Pinterest

Seasonal Decor

Christmas Mantel Decor Ideas

Christmas Mantel Decor Ideas

This post brought to you by At Home. The content and opinions expressed below are that of sincerely, sara d.

Christmas Fireplace Decor

This year, my fireplace received a Christmas makeover. This is a photo of my fireplace last Christmas:

Christmas Mantle Decorating Ideas

There was just too much going on, and  I wanted something calm and cozy this year.

At Home Christmas Decor Ideas

My home is filled with At Home Christmas Decor this year. (To see my recent dining room Christmas makeover, click HERE.) At Home has been my one-stop-shop! If you’re not familiar with At Home, they were formally Garden Ridge, and they have MUCH more than just Christmas decor. The store is huge and filled with every home decor item imaginable!

At Home Christmas Decor Ideas

At Home has 15 different themes that you can use on their own or group to make your perfect look: Seas & Greetings, Holiday Hoedown, Lavish and Luxe, Peppermint Jazz, Berry Platinum, Forest Fairy Tales, Crystal Chateau, Cherished Memories, Heaven and Earth, Midnight Plume, Regal Renaissance, Snowcapped Scene, Handcrafted from Around the World, Dem Darlings, and Handcrafted.   I used Lavish & Luxe and Crystal Chateau for my dining room, and Snowcapped Scene for my fireplace decor which includes:

    • Simple Wreaths


    • White Fur Stockings


    • Burlap Ribbon


    • Snowy Garland with Pinecones


  • Golden Antlers

Christmas garland

The Christmas section is unbelievable. At Home has a separate section devoted entirely to 101 varieties of artificial Christmas Trees. (I’ll be sharing my tree next week!). And they have holiday decor – both indoor and outdoor. I filled my cart full of so many pretty things thanks to At Home’s everyday low prices.

At Home Stockings

I love the texture these stockings give my space.  Fur and pom poms?  Yes, please!

Hanging Wreath

And these simple wreaths with pinecones showcase my Christmas art.

At Home wreaths

I just couldn’t say no to these gold antlers.

Gold Antler Decor

At Home Christmas Decor Ideas

When decorating your home for the holidays, do you stick with one decor theme or mix and match?

Also, I’ll be sharing my At Home Christmas Tree for Me next week!

Go create something!

Are you new to my blog? Go HERE to see my home tour and HERE to shop for items I use in our home.

Find me on Facebook | Instagram | Twitter Pinterest

Seasonal Decor

DIY Christmas Countdown

This DIY Christmas Countdown is the perfect holiday decor for your home.

DIY Christmas Countdown Craft

I was looking through Ballard Design’s catalog, and I fell in love with their chalkboard Christmas countdown.

Inspiration from Ballard Design

SO cute, isn’t it?!  I decided to recreate one for my dining room.

Canvas

I started with a large canvas.  (I found mine at Hobby Lobby and used a 40% off coupon.)

Chalkboard Paint

I painted the entire canvas (including sides) with two coats of chalkboard paint.

DIY Advent Calendar Supplies

Here are the supplies you need for the DIY Christmas Countdown:

  • Christmas Bulb Ornaments
  • Chalk
  • China Marker
  • Pencil or Pen
  • Painters Tape
  • Printout of Lettering
  • Rope
  • Nails
  • String
  • Scissors

Using the chalk, I figured out where I wanted the rope and bulbs to hang and added dots for the numbers.  I placed my Merry Christmas at the top, and to see my secret for transferring lettering, you can click HERE.

Adding dot & lines

I taped down the lettering and numbers using painter’s tape and followed my perfect chalkboard tutorial for transferring them to the chalkboard.

Laying out advent calendar

I then added nails to the back of the canvas and tied the rope to the nails.

Adding String

After the rope was strung, I added the ornaments using the string.

Christmas Chalkboard Advent Calendar

And my Christmas countdown was complete! You can either add the bulbs or remove them to countdown to Christmas.  I gave Christmas Day a slightly different bulb.

Christmas Advent Calendar

You can add your own style to the countdown through the font and/or ornaments.

Christmas Vinette with At Home

Click HERE to see all the details behind my dining room Christmas decor.

DIY Christmas Advent Calendar

Go create something!

Are you new to my blog? Go HERE to see my home tour and HERE to shop for items I use in our home.

Find me on Facebook | Instagram | Twitter Pinterest

DIY Christmas Countdown Tutorial    

Decor

This World Needs What You Hold

“This world needs what you hold.” – Amy Howard in her book A Maker’s Guide

12212368_10153230460753733_18645878_n

Last week, I had the amazing opportunity (along with 13 other bloggers) to travel to Memphis and spend time with Amy Howard, her husband Gene, and the Amy Howard team.

Amy Howard & Sara

Along with designing and manufacturing luxury furnishings, Amy Howard has created an artisan paint line.

Amy Howard

Our first evening in Memphis, Amy graciously invited us into her beautiful home to eat and spend time together.

Amy Howard.23

And I was in total awe of her talent. (I apologize for the quality of my photos.  We were at Amy’s home in the evening, and I’m a terrible photographer when there isn’t natural light available.)

Amy Howard.20

Amy’s the most amazing designer.  Not only does she have an eye for antiques and a vision for space, but she’s a true DIYer.  She gives life to forgotten pieces.

This world needs what you hold.

Amy Howard.17

This room and bed were absolutely to die for.  The walls were upholstered!

Amy Howard.12

And the bed was DIY’d to match the walls.


 Amy Howard Home.1

As I walked from room to room, I was greeted with unexpected and beautiful surprises.

Amy Howard.9

The half bath had a mirror she repurposed from a dresser with her lacquer paint.

Amy Howard.1

And the dining room was beyond gorgeous

. Amy Howard.4

Amy playfully mixed chairs around a pretty table.

Amy Howard Home.3

Not all of Amy’s rooms had patterned walls, but I found that I was drawn to those spaces, like this bedroom.

Amy Howard Home.6

Amy created a sophisticated but playful room for her granddaughters.

Amy Howard Home.4

I loved the mix of the fabrics.

Amy Howard Home.7

And the attached bathroom left no detail untouched.

Amy Howard Home.2

Perfection.

Amy Howard Home.12

Amy Howard.2

The kitchen had these amazing old sliding doors that opened to reveal pantries.

Amy Howard Bloggers

This was a group shot of all of us the first evening.  After a fun evening, we went back to the hotel and woke up bright and early for the painting workshop at the Amy Howard headquarters.

Amy Howard Bloggers copy

We spent the entire next day painting, and anyone who knows me knows there are few things I love more.

Sara at Amy Howard

It’s peaceful and therapeutic.

Amy Howard Presentation.1

And if the day could get any better, I was being trained by Amy Howard herself.

Amy Howard One Step Paint.1

We learned about her huge line of different paints.

Amy Howard Painting

She taught us techniques and details.

Amy Howard Laquer

And the color options were endless.

Amy Howard Display

Amy Howard Bloggers copy

The Amy Howard office was filled with pretty displays and painting ideas.

Amy Howard at Home Showroom

Amy Howard at Home Project

Amy Howard at Home Paints

This little trip filled my cup.  Not only am I excited to share my newly discovered painting knowledge, but I feel so refreshed after spending time with other creatives. I’m not quite sure how I got to the place where I am now, but I am so thankful.  I love creating.  As I’ve said before, I know God created me to create.  And, I love sharing what I’ve learned with you all, and I hope I give you the confidence to create. Besides being amazing gifted creatively, Amy Howard is an intelligent businesswoman.  In her book, A Maker’s Guide, Amy says, “Embracing your talents is accepting the gift of opportunity… Taking this opportunity to heart requires courage…Singers want to sing, painters want to paint, and teachers want to teach.  The most unnatural path in life is to not do what you were made to do.”

What were you made to do? This world needs what you hold!

Are you new to my blog? Go HERE to see my home tour and HERE to shop for items I use in our home.

Find me on Facebook | Instagram | Twitter Pinterest

*This post contains affiliate links.

Home

Blogger Spotlight: Harlow & Thistle

Blogger Spotlight: Harlow & Thistle

 Blogger Spotlight: Harlow & Thistle

I’ve just recently started spending more time on Instagram, and it’s full of a great community of people.  I find that generally, people are very encouraging, and Instagram is where Andrea from Harlow & Thistle and I “met”.  Andrea is from Toronto, and she is crazy talented.  I’m going to let Andrea take it from here:


I’d like to thank Sara for featuring Harlow & Thistle on her blog today. Sincerely Sara D is an inspiring blog and one that I aspire to be like! My name is Andrea and I am the founder of Harlow & Thistle DIY Blog and Etsy Shop.

10a_DIY Play Kitchen

Harlow & Thistle DIY Play Kitchen My blog features DIY projects for events and the home and my Etsy shop features invites and other printables. I originally launched my blog as a means to record all the fun details I created for my wedding.

DIY_DriftwoodMirror_0

Harlow & Thistle DIY Driftwood Mirror A year later I got pregnant with our first son and I was excitedly introduced to a slew of new DIY ideas. Now as a momma to two wonderful boys I feel even more inspired every day – from trucks to tractors – I’m loving it all : )

1_FullSizeRender-6

Harlow & Thistle – DIY Dinosaur Mason Jars Being creative is core to my being and I think it’s important to be creative every day – even if it results in my toddler trekking paint across my kitchen floor

15_DIY_BabyMoccasins

Harlow & Thistle – DIY Fringed Baby Moccasins

DIY_Spoons_7

Harlow & Thistle – DIY Painted Spoons

Andrea, thanks so much for visiting us today.  Go check out all the cool things she’s up to over at Harlow & Thistle!

Go create something!

Are you new to my blog? Go HERE to see my home tour and HERE to shop for items I use in our home.

Find me on Facebook | Instagram | Twitter Pinterest

Home

Everything But The House

EBTH Purchase

Are you familiar with Everything But the House (EBTH)?  I discovered them earlier this year and have been obsessed with their site ever since.  


Narrow by city  

EBTH describes itself as “estate sales reinvented.”  They are an online estate sale which means you can shop locally or nationally.

  EBTH Sale

Here’s how it works:

  1. Individuals/families contact EBTH to help them sell a home full of items.
  2. EBTH experts sort, evaluate, photograph, and describe every item to be sold.
  3. The sale goes live! All sales run 7 days and each item starts at $1.  EBTH manages the payment, pickup, and shipment of the items.

Winning Bid  

I participated in a local auction and began bidding on three items.  However, I decided I just HAD to have this ornate bench.  Luckily I won the auction, and a few days later I went to the south side of Indianapolis to pick up my beautiful piece!

EBTH online auction review

You can have the items shipped, but I bid on a local auction knowing I could save on shipping by picking up the item myself.

EBTH Online Sale

The auction was on the most beautiful property with the cutest red barn which just added to the EBTH charm.

EBTH Everything But The House

I was greeted by friendly EBTH staff who were incredibly kind and organized.  They immediately knew where to find my bench.

Loading the Bench EBTH

In a few minutes, it was loaded into my car for me.

EBTH Bench Winning

I love the ornate bench.  It’s extra-long and fits at the end of my bed perfectly.

EBTH Bench

I fell in love with the bench because of all the details.

EBTH Bench Purchase

However, it has some paint scrapping off (EBTH fully disclosed this in their detailed photos before I purchased), so stay tuned.  This piece will get a pretty little makeover.

EBTH close up

I love my new EBTH bench, and the auction process was SO fun!

EBTH Bench Details  

Go create something!

Are you new to my blog? Go HERE to see my home tour and HERE to shop for items I use in our home.

Find me on Facebook | Instagram | Twitter Pinterest

*This post contains affiliate links and is a sponsored post through Everything But The House. I received compensation in the form of product in exchange for my review. I take pride in reviewing only products that fit my brand and will be beneficial to my readers. And while this post is sponsored, all the opinions are my own.

Home

Reader Spotlight: Kristi’s DIY Shoe Cubby

Reader Spotlight: Kristi’s DIY Shoe Cubby

Shoe Cubby Lookalike

A few years ago, I found an old mail sorter at a local antique shop.  Since then I have used it to store my kids’ shoes in our mudroom area.  (To see more, click HERE.) Recently a reader contacted me with a photo of a DIY shoe cubby that was inspired by my antique mail sorter.
Home Made Shoe Cubby

Isn’t this pretty impressive?!

Reader Kristi

Meet Kristi from Texas.  She’s a DIY girl who learned the art from her mom.  Kristi told me, “my mom used to do woodworking when I was little…She passed away suddenly three years ago.  When we bought a used playset soon after (that needed some work), I thought of her and knew I had it in my genes to figure out the power tools! And it’s just been a fun journey from there!

Building a shoe cubby.

Kristi enlisted her husband to help with this project, and the nail gun they purchased came in really handy.

Building a shoe cubby

After building a workbench, this is Kristi and her husband’s first DIY furniture piece. (Just look at that beautiful workbench – don’t you love those red casters?!)

Progress

A couple that DIYs together…stays together.  Right, Kristi?!

Shoe Cubby Mail sorter

Kristi loves her shoe cubby because “it works perfectly for our 6-yr old twin girls’ shoes that used to pile up in the laundry room because  as we all know that taking them to their bedroom closet is too much to ask!”

Shoe Cubby Progress

The problem with my shoe cubby is that my 10-year-old son’s feet are getting too big for the slots.  Kristi has a great solution for this: “As their shoes get bigger, I’ll probably just pull it away from the wall about an inch or two and add trim to the top and sides to hide the space! It will definitely be a permanent fixture in our house!”

Complete Shoe Cubby

Not only is Kristi incredibly brilliant, but she’s pretty talented, too!  (And a shout-out to Kristi’s husband!)

Home Made Shoe Cubby

Thanks for sharing your amazing DIY with us, Kristi!

Would you like me to share other projects done by readers like this Reader Spotlight: Kristi’s DIY Shoe Cubby?

Go create something!

Are you new to my blog? Go HERE to see my home tour and HERE to shop for items I use in our home.

Find me on Facebook | Instagram | Twitter Pinterest