I love stencils because you can get the look of wallpaper without the commitment. They can easily be painted over if you grow tired of them.
The really great thing about this stencil (as well as several of Royal Design Studio’s larger stencils) is that it includes a smaller ceiling stencil to get in the really hard-to-reach ceiling line.
This stencil project wasn’t hard, it just required a little patience and time (and some good music!).
Since I didn’t really have a central point (the doorway is off to the side), I decided to start at the end of my kitchen hood and work my way across the wall.
Your stenciling success will depend on your paint usage. Less is more in this situation! (For this entire wall, I only used a quarter of a pint of paint.) I used a foam roller for the flat areas and a stencil brush for the more difficult areas – like the ceiling line.
Don’t get lazy and stop measuring or using a level. This is what can happen:
I just painted over the section, let it dry, and used my level to make sure the stencil was right this time before I re-stenciled.
And here’s my finished product!
My walls are painted in Valspar’s Cincinnatian Hotel Briggs Beige and the pattern was stenciled in a cream color.
Here’s a Lena photo bomb. And yes, she’s wearing wolf ears.
Go create something!
Are you new to my blog? Go HERE to see my home tour and HERE to shop for items I use in our home.
I’ve blogged about many different chalk paint projects, but I felt like I needed to provide a basic, step-by-step chalk paint tutorial for you.
Chalk paint is so great because it requires no prep work. You don’t need to sand or strip paint – you just go for it! For this tutorial, I’m using a wooden plaque I picked up at a craft store. But you will use this same technique on furniture, cabinets, or whatever else you are chalk painting.
For the chalk paint, I am using Annie Sloan chalk paint. You can find local retailers by going to her website. There are several other chalk paint options out there – don’t be afraid to test them out!
First, paint the entire piece with chalk paint. I often use a brush (for larger areas I sometimes use a small roller), and you’ll find that a little paint goes a long way. You may only need one coat, but I find that I usually need two. This paint dries really fast, and you’ll be able to tell when it’s dry. Apply the second coat of paint AFTER the first coat is dry.
You can use other finishes, but Annie Sloan’s wax is one of my favorites. Apply two coats of wax on the piece using a wax brush. You DO NOT have to wait for the first coat to dry before adding the second coat. I love wax for furniture pieces, but I would NOT recommend wax on tabletops, desktops, or cabinets. Go here to see why I don’t recommend wax on kitchen cabinets.
Like the paint, a little wax goes a long way. It’s pretty easy to see if you’ve missed any spots. After you have applied the wax with the brush, use a lint-free cloth to buff and remove any extra wax.
This next step is optional. Dark wax is good if you want to bring out details and/or like the aged look. You must first apply the clear wax BEFORE you apply the dark wax. Go easy on the dark wax. You won’t need much!
In this tutorial, I only applied dark wax around the edges. You can buff with a lint-free cloth as you did with the clear wax.
If you first applied the clear wax BEFORE you applied the dark wax, you can use the clear wax to erase and dark wax mistakes or if you find that you want a little dark wax. Dip the cloth in the wax and rub away the dark wax.
You can sand the edges if you really like the distressed look. In my tutorial, it’s hard to see the distressing since I painted white over a light wood. However, sanding the edges can add a lot of interest. Especially if you paint over a dark piece of wood.
One more thing you can add to the chalk paint is gilding wax. This can be found at any craft store and comes in a variety of colors. I used my finger and apply this. For this tutorial, I applied the gold wax to the edges.
And that’s the end of the tutorial! Once you get started, you’ll find that chalk paint is really user-friendly. Here are some projects I’ve done with chalk paint: This first project is a headboard I paint with chalk paint (I also painted the upholstered fabric). The headboard was gold, and I painted it with gray chalk paint and used clear and dark wax. I also distressed/sanded it. To see more, click HERE.
This next piece was a dark trunk that I painted with gray chalk paint. I used clear and dark wax as well as the gold gilding wax.
This ornate piece is part of my daughter’s bedroom set which was originally white. I used gray chalk paint and clear and dark wax. I also sanded it.
This is my daughter’s headboard. The piece was originally white, and I painted it with turquoise chalk paint. I used clear wax and sanded. To see more in her room, click HERE.
This is a hutch I painted for my kitchen. The hutch was originally dark, and I used yellow chalk paint. I used clear and gold gilding wax and heavily sanded. You can see more if you click HERE.
I painted the legs on my dining room table gray. The table was originally dark, and I used clear wax and a little sanding. You can see more by clicking HERE.
This is a free dresser that was handed down to me. It was dark, and I used white and gray chalk paint. I also used clear and dark wax and sanded the piece. You can see more by clicking HERE.
This is a bench that we made from a headboard. The headboard was originally a tan color, and I used green chalk paint with clear wax. I also sanded it. You can see more on this project by clicking HERE.
I also have a FREE chalk paint tips printable you can get by clicking HERE. I hope after reading through this tutorial you have the confidence to go for it! Chalk paint is a fun and easy way to instantly transform a piece. Go create something!
Are you new to my blog? Go HERE to see my home tour and HERE to shop for items I use in our home.
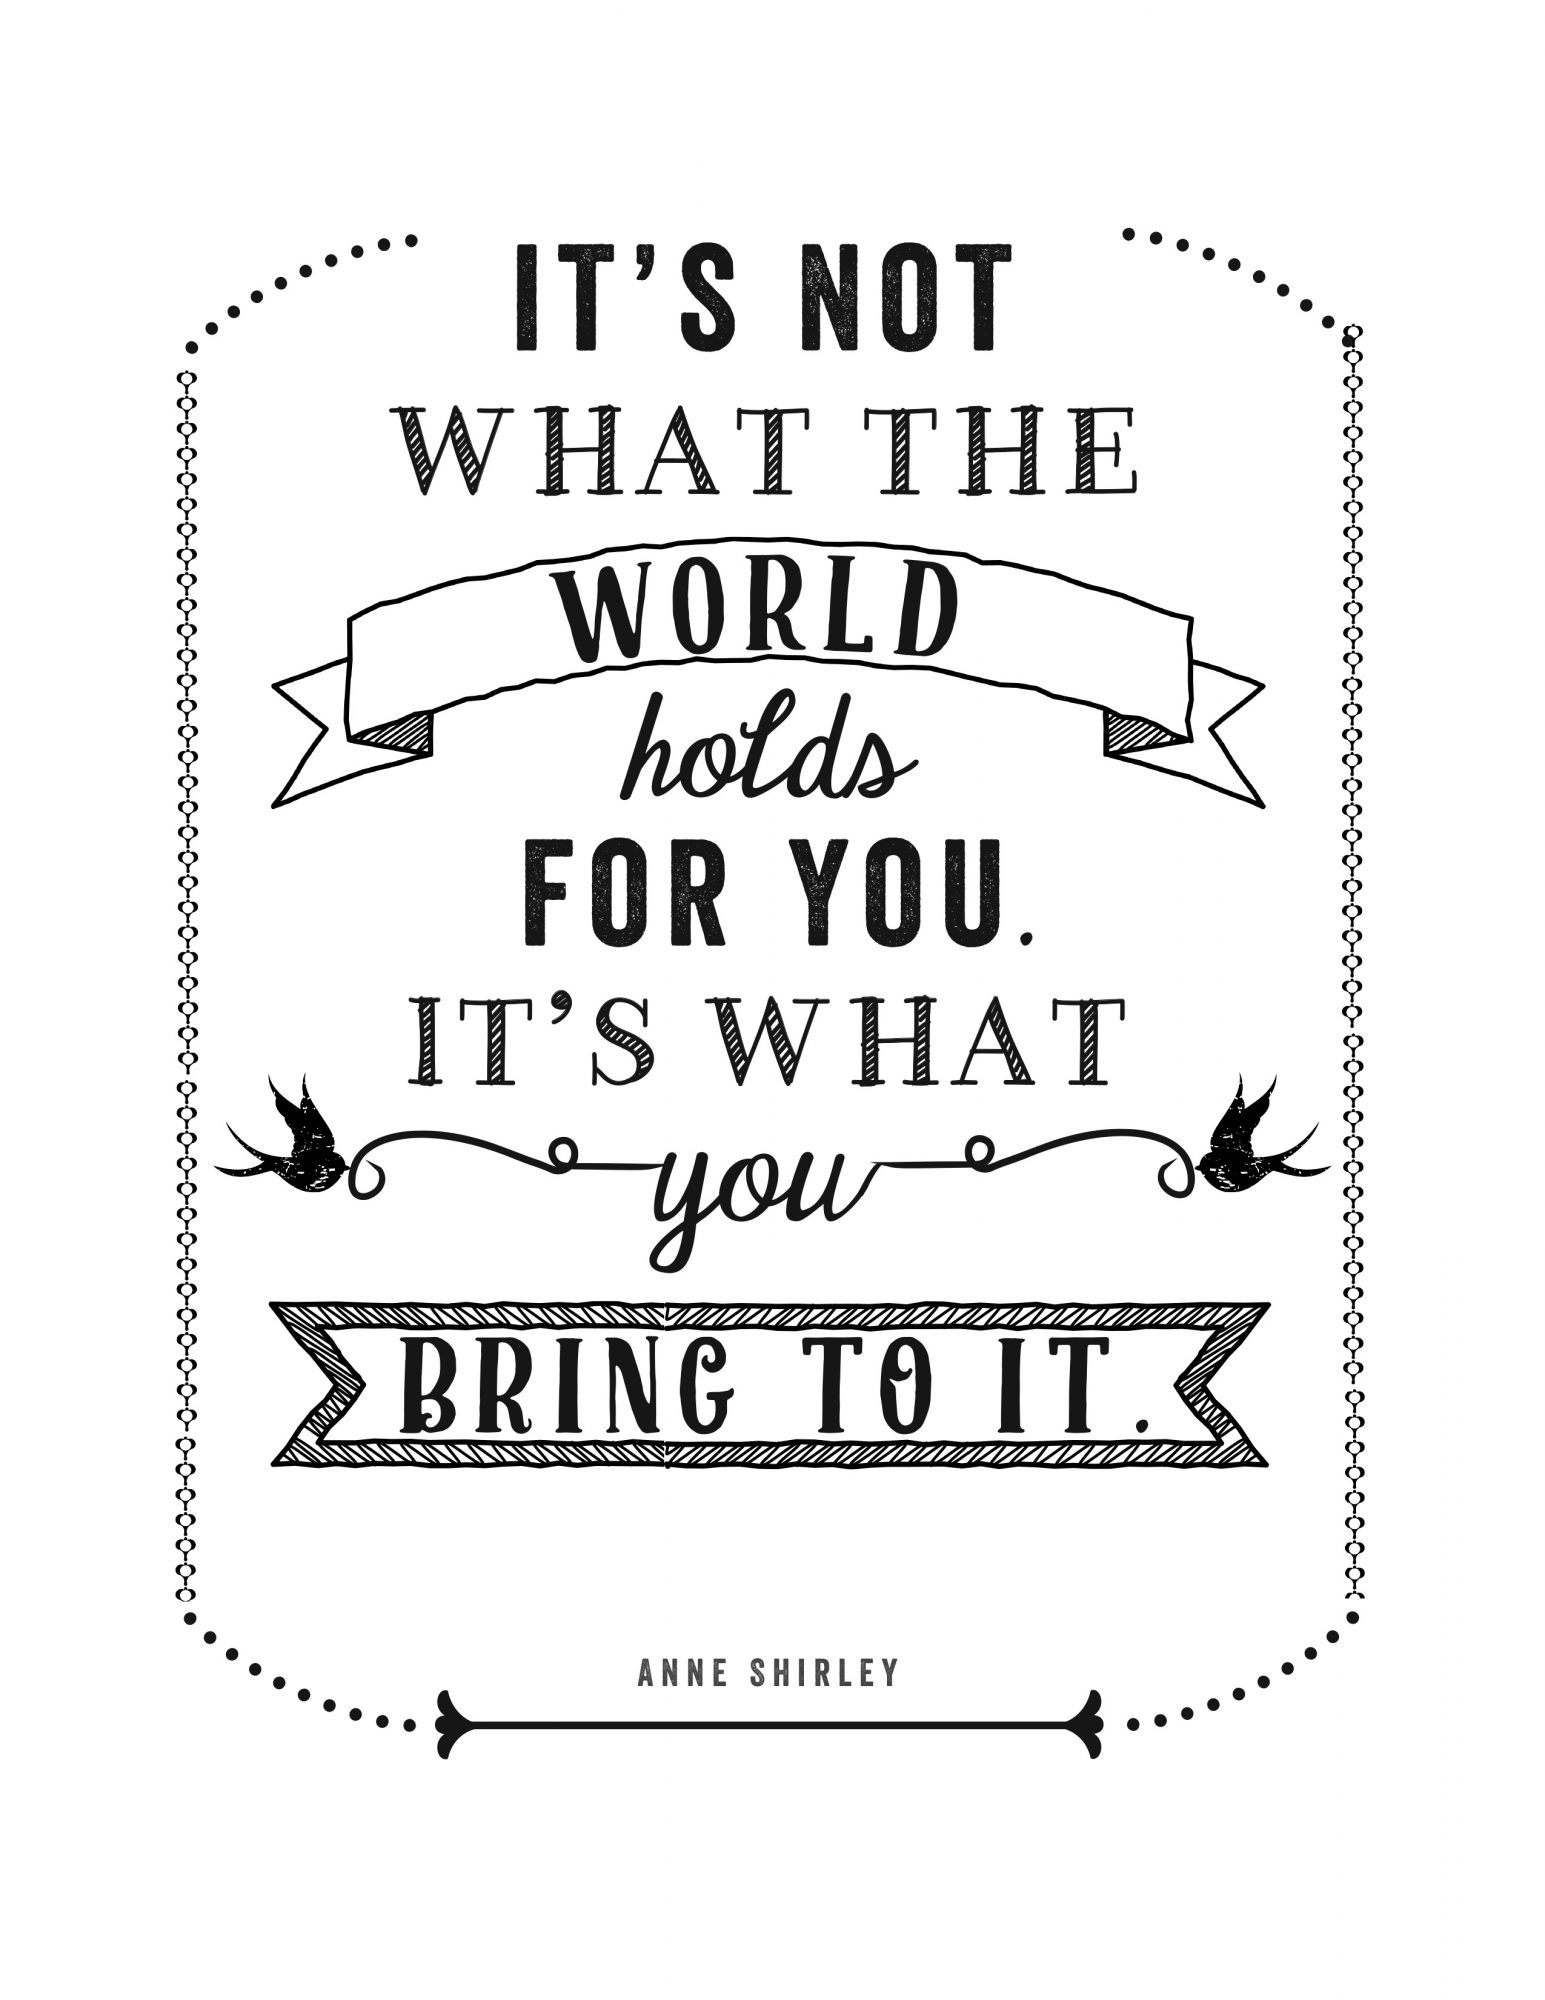
Where are my Anne of Green Gables fans? I have a fun Anne Shirley Print to share with you today, and it’s FREE!
It’s Not What the World Holds for You, It’s What You Bring to it. – Anne Shirley
Isn’t this so true?
This print would make a fantastic (and inexpensive) graduation gift – just print it out and frame it. It’s always encouraging for any of us. Print one out and hang in on your fridge or bathroom mirror!
If you want the PDF file (sized to 8×10), just click on the image below:
If you want the JPG file of this Anne Shirley Print, just save the JPG below:
What are your favorite Anne Shirley quotes? The Anne of Green Gables series is FILLED with so many.
I also have a bunch of free printables on my blog – everything from Bible verses to chore charts to holiday prints. Click here to see more!
Go create something!
Are you new to my blog?
Go HERE to see my home tour and HERE to shop for items I use in our home.
*All Sincerely Sara D. printables are for personal, non-commercial use only. Useit, gift it, but don’t alter it, sell it or otherwise distribute the print or the file.
My blog was recently featured on Design Mom. Design mom is a blog created by Gabrielle, and it is full of great home decor inspiration and lots of various home tours.
Design Mom is where you will find the intersection of motherhood and design. From DIY projects and home tours, to book reviews, family-friendly travel, and discussions about modern parenting, Gabrielle does it all in her amazing blog. Gabrielle at Design Mom has a series called Living with Kids. In this series, she does a home tour and interviews a mom. And guess what?! I was that mom this week! I’m incredibly honored and excited to be featured on Design Mom and would love for you to check it out HERE.
The interview took us three rounds to get where Gabrielle felt we needed to be. (Apparently, I have a hard time talking about myself. I just wanted to talk about my DIY projects, but Gabrielle was searching for me.) It almost felt a little like a therapy session, and if you ever wanted to know way too much about me…well, here’s your chance!
Thanks so much to Gabrielle for the feature!
Go create something!
Are you new to my blog? Go HERE to see my home tour and HERE to shop for items I use in our home.
My boys have a large United States map mural in their room. I have been wanting to do something fun with the space, so I headed over to Dollar General to see what I could find in their home decor section…
I found (4) clocks, a lamp base, a lamp shade and a basket – all for under $30!
These 9 inch wall clocks are a steal at $4 each and perfect for a time zone display.
This lamp was another great deal from Dollar General! I spent $12 total on the the lamp base and the lamp shade.
Dollar General has lots of storage baskets in all sizes. This one was only $1. Seriously how could I say no?!
I’ve created a free printable of the time zones if you want to recreate my U.S. time zone clock display. I printed out mine on kraft colored paper.
I used rubber cement to adhere the paper to the foam board.
And then I used an x-acto knife to cut out my time zone signs. And used Command Strips (also found at Dollar General) to hang the signs.
The boys love their updated space, and I love how inexpensive it was to the create it!
I originally had the clocks running, but the ticking was too much for the boys at night. We ended up just leaving the clocks stationary…
Go create something!
Are you new to my blog? Go HERE to see my home tour and HERE to shop for items I use in our home.
Find me on Facebook | Instagram | Twitter | Pinterest
Today I’m sharing how I created the perfect coral paint.
I was recently asked by a friend to paint her daughter’s bedroom furniture. The daughter wanted this to be the inspiration for her new bedroom: (Image found on Pinterest)
I am not sure of the source of this design board, but it is a gorgeous inspiration! I love the contrast of the deep navy with the playful coral. The two colors compliment each other so well.
The furniture my friend gave me has already painted a soft pink.
It was very pretty, but this almost ten-year-old was ready for something a little more grown-up and bold.
To get this coral color, I used three Annie Sloan colors:
Barcelona Orange – Pure White – Emperor’s Silk I mixed: 1:2:1 1 part Barcelona Orange: 2 parts Pure White: 1 part Emperor’s Silk And this was my result:
I think this is the perfect coral paint color!
I also painted the dresser in the same color.
I used gold paint for the handles and accents. The coral and gold accents work so well together. I think I am in love!
Would you be brave enough to add coral and gold to your home?
Go create something!
Are you new to my blog? Go HERE to see my home tour and HERE to shop for items I use in our home.
Find me on Facebook | Instagram | Twitter | Pinterest Want to see what else I’m up to? Click on the photos below to see some more fun DIY projects!
Interested in more chalk paint information? Go to the search bar at the top right corner of the page and search for “chalk paint.” You’ll find lots of tutorials and helpful tips and tricks!
If you missed the first part of my home tour that I shared last week, you can click HERE.
Last week I talked about the limitations of my photography. I have never had luck taking photos of the walls of windows in my home. Thanks to Melody of Carpenter Photo, I now have photos that show the windows! This is our master bedroom. I honestly haven’t done much to the room yet other than move our stuff in.
Isn’t she fun? I display some of my favorite necklaces here.
Amazingly, this shot wasn’t staged. (?!) My friend brought over her two kids, and we asked the kids to stay in the playroom. When we went to check on them, my oldest was entertaining everyone with a magic show. Now, this didn’t last long, but I’m glad we got a photo of it while it lasted! If you want to see more details about our playroom, you can click HERE.
The painted headboard in our guest room is one of my favorite furniture redos I’ve done. You can see more by clicking HERE.
This picture WAS staged. The barn door headboards are another favorite project.
Recently Steve and I were able to go off on a vacation AND leave the kids behind. We’re so thankful to have two sets of parents who are able to help, and the kids split their time between them (and thoroughly enjoyed the week with Gramma & Grandpa and Nana & Papa). I knew that I needed a project for my retired dad who needs to be busy all the time (see where I get it?!), so I left him the plan and supplies for the half bath wall paneling.
Before I left for the trip, I drew the lines and did the math for the trim.
I also removed the bottom half of my starched fabric wall. (Want to see the full tutorial? Click HERE.) I used a ruler and a knife to cut away the fabric, and the wall was PERFECT when I pulled off the starched fabric. It was ready to go – I didn’t have to do any repairs or scrub away any extra starch.
I wish I had the full tutorial for this, but the technique was very similar to what we did with the wall in the dining room. My dad used nails for the trim and tried to find studs whenever possible.
We caulked the trim and nail holes. The wall, molding, and existing bottom trim were all painted the same color – a very light cream.
I bought special corner trim for the corners to make the project easier.
I found the mirror online at Pottery Barn and the lights are from Lowe’s.
I’ve been wanting to share an actual home tour with you all, so I asked my friend Melody of Carpenter Photo for her assistance. The world just looks prettier through her lens. I first have to preface this tour with how peaceful the home tour looks. But I have to tell you. It was CRAZY to make this happen. First the kids were all home because of a snow day. Cleaning your house with kids is like trying to shovel a blizzard. Then, we had my three kids and my friend Mel’s two kids all running around during the entire shoot. And I also have to add that I decluttered for the photo shoot – the hallways and closets were filled with stuff. Now that I got that out of the way, here’s the tour!
I have never been able to show this wall of windows because of my lack of photography skills. I’m so excited to share this photo – especially because it’s one of my favorite things about our home.
We recently added the wall paneling to our dining room. Click HERE to see the tutorial.
I painted almost everything you see in my kitchen. To see more about the painted cabinets, click HERE. If you want to know more about my painted chalkboard fridge, click HERE. And if you’re curious about my painted floors, you can click HERE.
This is another area I’ve never really been able to share because of the light that floods in from the windows.
This is our back entry area off the garage. If you want to know more about the chalkboard calendar or shoe cubby, you can click HERE.
Next week I’ll share the second part of my home tour!
Go create something!
Are you new to my blog? Go HERE to see my home tour and HERE to shop for items I use in our home.
It’s been one year since I went for it and began to consistently share my creative endeavors with you. I appreciate your love and encouragement because I have many times of doubt creep in, yet I continue to blog because I really feel like I am supposed to… It’s been fun to look over my past year of posts. As someone who thrives on a sense of accomplishment, my blog has been a portfolio of a year of accomplishments (as well as some major flops!). However, I realize though that I haven’t shared much regarding myself personally and who I am.
I have always felt the urge to create. As a kid, I remember spending a lot of time coloring and drawing. In college, I planned on majoring in art but left my first drawing class feeling completely inadequate and dropped out to pursue business. Before beginning my Junior year, I felt the overwhelming urge to try again, and I graduated with a second major in art & design. After college, I worked as an art director at a greeting card company. I loved that job and the creative environment.
Almost ten years ago, I had my first son (Bryant). Steve and I felt it was best for our family if I stayed at home (he was working crazy hours at the time, and I had a ridiculously long commute). In the next five years, another son (Benson) and a daughter (Lena) came along. At home with three young children was wonderful and crazy. Needing sanity from caring for young kids, I painted. And I painted. The walls in my home were my canvas.
Looking back, I did some really crazy projects with that paint. But it was my peace. My quiet. My creative outlet. The walls could be repainted – and probably have been as new owners now inhabit that house. Fast forward to now. We moved into a new home a little over a year ago which means I have a blank canvas. My boys are both in school, and I’m finding more time for the first time in years with only a three-year-old home. As my purpose continues to evolve, I still feel that all along God created me to create. How that looks specifically has changed through the years, but for now, it means I share my creations with you.
I hope to inspire you through my trial and error. I hope I can give you the confidence to create. I’ve met so many people through blogging – both virtually and in person. It’s been such an honor and privilege to get to know you. I am constantly learning and having fun on this journey with you! If you had told me one year ago that I would be where I am today with the blog, I would have been overjoyed.
You guys are the most encouraging group of readers, and it’s because of you all that I am where I am today!
Thank you!
Go create something!
Are you new to my blog? Go HERE to see my home tour and HERE to shop for items I use in our home.
I was gifted a couple of Paint-A-Pillow sets and wanted to share my experience with you.
I was given the opportunity to review the fun new product, Paint-A-Pillow.
Paint-A-Pillow is a kit that gives you everything you need to paint your own pillow: Pillow cover, pillow insert, stencil, paint, stencil brush, paint tray, paint roller, paint stirrer, instructions, test stencil, and test fabric. You can also buy additional paint, brushes, and embellishments if you want. I ordered some additional paint colors, brushes and studs as well as an extra pillow cover and pillow insert.
The Paint-A-Pillow kit includes easy-to-follow instructions AND pictures.
For my first pillow, I used the instructions for the multi-color stenciling.
But before I started painting my pillow, I used my (adorable!) test stencil and fabric.
I used the brush to test it out since I was going to use a brush for my stencil – because of all my colors. (A roller is great when you’re using one color. More on that later!) Basically, you just dab with the brush in up and down motion. Don’t go crazy on the paint because less is more!
I have to admit. I was shocked at how easy it was! (I was a little worried that I may screw up the test sample. But seriously, it was EASY!)
Now armed with confidence, I decided to go for it! It’s recommended that you go from light to dark colors. I began with neutral gray.
And I just kept going…
And going!
The stencil is held in place with these metal prongs. It’s amazing. Your stencil doesn’t move.
Once you’re done painting, you let it dry. Then you can loosen the prongs and remove the stencil.
The pillow cover comes with a cardboard insert. Since I wanted to add some brass studs, I left the cardboard in. I just used my thumb to press the brackets through the fabric and onto the cardboard.
The smaller studs required a little extra help. I used the paint bottle to push them through.
Once I had all my studs in place, I carefully pulled them away from the cardboard and removed the cardboard. Then, I turned the pillowcase inside out and used the end of a pen to bend the brackets.
I had completed my first pillow!
I washed the stencil – which was really easy to clean. And I began a second pillow. This time I used the natural cover (instead of the white). The first pillow was designed around my office, and this pillow was going to go in my family room. I used the roller and rolled the entire stencil in white. This pillowcase was a neutral color, so I thought it would be pretty (and work well in my family room decor!) to create a muted neutral design using only white and gray paint. Since white is so light, I painted the entire pillow in white first. (And it was SO fast!)
After I painted the white, I started painting over some of the white with the neutral gray. After my success with the first pillow, I got braver and decided to try an ombre look on the outer right with gray and white. I added the neutral gray to the outer edge of the last right.
Then I mixed the white and neutral gray and added this to the center of the outer right – leaving the inside of the outer right white.
I decided not to embellish this pillow. And although completely different from my first design, I loved it!
After the paint is dry (and before you add embellishments), you can set your paint with an iron. I definitely would recommend this. I have kids. These pillows will get dirty and some point and need to be washed.
I love the versatility. I had one stencil and created two completely different (and unique) looks for my home! Go create something!
Are you new to my blog? Go HERE to see my home tour and HERE to shop for items I use in our home.
Recently I’ve been admiring all the wall treatments I’ve been seeing on Pinterest, and I just knew the square version would be perfect in my dining room. I’m sharing the tutorial for our dining room wall treatment.
It’s so hard to visualize what it will actually look like in real life. So, I actually measured and drew out the squares on the wall.
I am SO glad I did this step because I actually decreased the square size and added two more rows. What looked perfect on paper was not so perfect in real life. Want to know more about this floral (“faux wallpaper“) wall we covered? You can see more HERE. Also, before I drew out my lines, I lightly sanded my flowers to keep them from showing through the paint later.
Now with the additional squares, I figured up the supplies I needed for my plans and picked up the supplies from Lowes. I used .688x 3in x 8ft Primed MDF Moulding for most of the wall. The top horizontal piece was wider than the rest of the pieces, and this was the same MDF listed above, except it was 5.5 inches wide. I wanted the wall treatment to be a dark gray so my white buffet would really pop. I went ahead and painted the back of the wall to make the painting a little easier later and to make visualizing the wall treatment even better. This made it more difficult for my husband to follow the lines, so I would skip this step next time.
Now is where my husband stepped in. He put the baseboard in first (he used trim nails for this and hit studs whenever possible).
Next, he put up the wider piece at the top.
Now it was time to put in the vertical pieces.
And then, it was time for the small horizontal pieces – lots of cutting, leveling, and fitting. If you aren’t using glue, many of the pieces (the ones that aren’t attached at studs) will be pretty loose. But because we use caulk next, don’t stress out too much!
I went through and used a nail setter to push the nails deeper so we could hide them with wood filler.
Then we filled the holes with wood filler.
We caulked along all the edges.
And then we let everything dry.
Once the filler was dry, it was time to sand. First, I tried hand sanding and realized this was a job for the electric sander.
It made a mess and took forever.
I really should have sanded more – there are imperfections I left from not sanding enough, but I’m going to live with these for now.
The paint is Valspar from Lowes. The wall is Woodlawn Colonial Gray and the paneling is Mark Twain House Ombra Gray.
I really love it and have to give my husband a HUGE shout out for an amazing job!
**UPDATE: We added some trim to the inside of each square (and new paint color). See more on that HERE.
Go create something!
Are you new to my blog? Go HERE to see my home tour and HERE to shop for items I use in our home.


